前言
GPS系列——Java端,github项目地址
前面已经了解或者实现了Android端的gps上传定位信息,现在就差后台的接口支持了。
我们需要数据库来储存上传的定位信息,并且还要满足不同的人的数据隔离,也就是用户系统。
下面就给大家介绍Java端的主要实现和代码,更多更详细的内容,还是得看源码。
对大家有用的知识,大家自行拷贝使用。
GPS定位系统系列
目录
[TOC]
收获
学习完这篇文章你将收获:
- springboot+mybatis的主流应用
- jwt的token全局验证
- 上传文件及其文件映射
- 跨域问题处理
- 全局异常处理
- gps定位、用户表设计
- mybatis-generator配置
正题
一、Java技术框架
java8
springboot + mybatis
jwt
mysql
mybatis-generator
运用比较主流的springboot框架,数据库框架mybatis,token验证jwt,mysql5.7.0,mabatis-generator自动生成bean\dao\mapper
二、环境准备
java环境、mysql
建议使用docker来管理java的发布、mysql、nginx,后面会有专门GPS定位系统(五)——Docker,来介绍容器下web、java、mysql等环境搭建。
三、开发步骤
1、创建数据库,设计创建数据库表
2、配置好datasource的连接信息,application.yml里面datasource
3、配置mybatis-generator的config配置文件,并生成bean、Mapper的java文件和xml文件
4、编写controller所需接口
5、全局异常处理
6、全局token验证处理
7、测试、发布
四、数据库表
user:
1 | CREATE TABLE `user` ( |
gps:
1 | CREATE TABLE `location` ( |
mybatis-generator配置
1、在根目录下创建generatorConfig.xml文件
2、配置
1 |
|
pom.xml
1 | <plugin> |
注意:如果在maven打包的时候,会再次调用mybatis-generator一次,会重复生成文件。这时候,需要配置execution的goals,这样就不会再次生成一份文件。
1 | <executions> |
3、双击【maven】-【plugins】-【mybatis-generator】-【mybatis-generator:generate】使用
注意:如果已经生成了,再次会重复生成文件,不会覆盖。java文件是会多生成一份,到时候可以拷贝即可使用;xml mapper文件会内容叠加一部分,到时候可以删除原来的,即为最新的。
五、接口功能
userController
获取所有注册controller的url
创建用户
- 更新用户
- 删除用户
- 登录
- 获取所有用户
- 上传头像文件
特殊接口的mapper:
1 | <select id="getUsers" resultType="com.jafir.springboot.service.model.result.AllUserResult"> |
gpsController
- 上传gps信息
- 获取某用户的gps定位
- 获取所有用户的gps定位
- 获取某用户的轨迹数据
特殊接口所需的mapper:
1 | <select id="getAllNowGps" resultType="com.jafir.springboot.service.model.result.NowGpsResult"> |
此sql较为复杂一些,意为获取所有用户的最后一次上传的位置信息,即为获取所有用户的实时定位
接口功能都比较简单,主要就是提供这些接口供移动端、web端使用
注意:
- 例如登录、获取用户信息等接口,一般数据库查出来都是user类型的数据,但是敏感字段password等,是不能返回的,可以直接把数据库查出的User对象,setPassword(null)
- 登录成功后,使用jwt用username\userId生成token,返回
- 做了token验证之后,很多接口,如果是请求自身数据,不需要再传userId,header获取token,使用jwt可以获取userId、userName等
例如:
1 | (value = "/get_info", method = {RequestMethod.POST, RequestMethod.GET}) |
六、上传头像文件
1 | (value = "/upload", method = RequestMethod.POST) |
一般上传文件后都要返回其url,这里需要在application.yaml配置静态资源映射。
1 | spring: |
映射 : classpath:/static/ xxx => /res/ xxx ; /Users/jafir/Downloads/upload/ xxx => /res/ xxx
classpath路径为相对路径,相对于jar包中class存放的目录(可以把打的jar包解压,然后就可以看到class和satic目录)
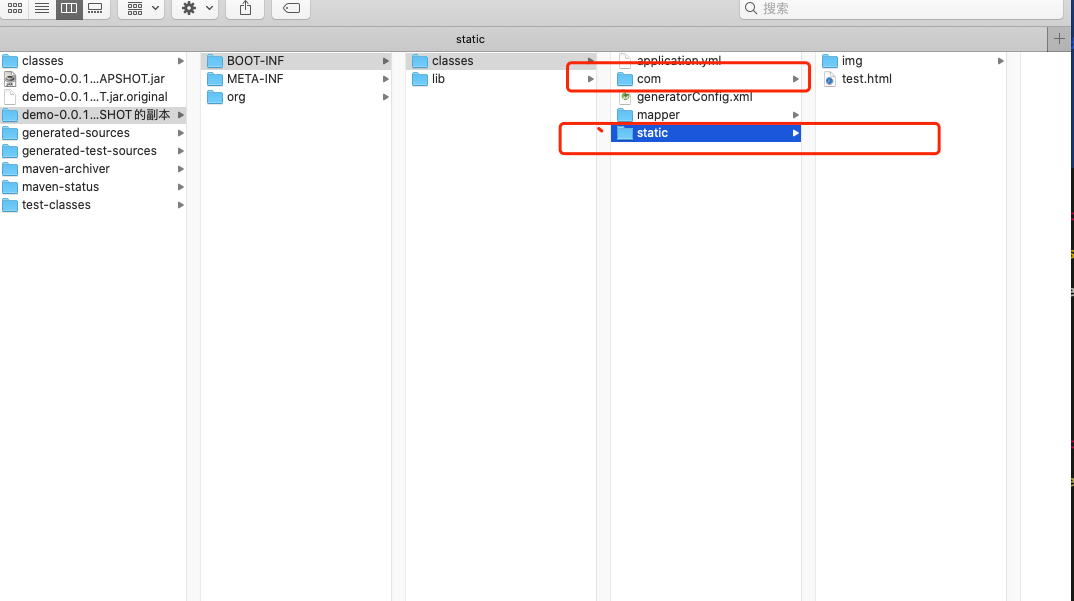
这样的话上传就会传到1
2
3
4
5
6
7
8
9
10
11
12
13
14
15
16
17
18
19
20
21
22
23
24
25
26
27
28
29
30
31
32
33
34
35
36
这里没有使用oss等云存储,一般情况下,最好是**云存储**。这里存在本地磁盘上面,是在系统文件的根目录为起点的文件目录`/User/jafir/Downloads/upload`下面(当前是我mac的目录,大家可以自行配置)。

这样做的好处是:开发环境下,文件上传到固定的地方,并且不会随着项目的clean而丢失;线上环境下,文件也会存在于相应服务器的根目录为起点的文件目录下。


### 七、token验证

```java
public class TokenInterceptor implements HandlerInterceptor {

    @Override
    public boolean preHandle(HttpServletRequest request, HttpServletResponse response, Object handler) throws Exception {
        LogUtil.info("url:" + request.getRequestURI());

				//解决axios ajax跨域问题
        if ("OPTIONS".equalsIgnoreCase(request.getMethod())) {
            LogUtil.info("OPTIONS:" + request.getRequestURI());
            return true;
        }

        String token = request.getHeader("token");
        LogUtil.info("token:" + token);
        if (null != token) {
            boolean result = JwtUtil.verify(token);
            if (result) {
                //存在且正确 不拦截
                return true;
            }
        }
        //不存在或者错误抛异常
        throw new TokenException();
    }

}
注意:关于axios或者ajax请求接口的时候,一般情况会首先发出一个OPTIONS的请求来刺探是否能够请求成功,如果自身没有OPTIONS这类型的接口的话,我们TokenInterceptor应该放行此请求行为,不然的话会验证不通过
WebAppConfig.java文件
1 |
|
excludePathPatterns可以配置放行一些不需要验证的接口,例如登录、获取资源等
注意:在配置WebAppConfig的时候,注意最好使用1
2
3
4
5
6
7
8
9
10
11
12
13
14
15
16
17
18
19
20
21
22
23
24
25
26
27
28
29
30
31
32
33
34
35
36
37
38
39
40
41
42
43
44
45
46
47
48
49
50
51
52
53
54
55
56
57
58
59
60
61
62
63
64
65
66
67
68
69
70
71
72
73
74
75
76
77
78
79
80
81
82
83
84
85
86
87
#### jwt:

```java
public class JwtUtil {
    /**
     * 过期时间一天,
     * TODO 正式运行时修改为15分钟
     */
    private static final long EXPIRE_TIME = 24 * 60 * 60 * 1000;
    /**
     * token私钥
     */
    private static final String TOKEN_SECRET = "f26e587c28064d0e855e72c0a6a0e618";

    /**
     * 校验token是否正确
     *
     * @param token 密钥
     * @return 是否正确
     */
    public static boolean verify(String token) {
        try {
            Algorithm algorithm = Algorithm.HMAC256(TOKEN_SECRET);
            JWTVerifier verifier = JWT.require(algorithm)
                    .build();
            DecodedJWT jwt = verifier.verify(token);
            return true;
        } catch (Exception exception) {
            return false;
        }
    }

    /**
     * 获得token中的信息无需secret解密也能获得
     *
     * @return token中包含的用户名
     */
    public static String getUsername(String token) {
        try {
            DecodedJWT jwt = JWT.decode(token);
            return jwt.getClaim("loginName").asString();
        } catch (JWTDecodeException e) {
            return null;
        }
    }

    /**
     * 获取登陆用户ID
     *
     * @param token
     * @return
     */
    public static String getUserId(String token) {
        try {
            DecodedJWT jwt = JWT.decode(token);
            return jwt.getClaim("userId").asString();
        } catch (JWTDecodeException e) {
            return null;
        }
    }

    /**
     * 生成签名,15min后过期
     *
     * @param username 用户名
     * @return 加密的token
     */
    public static String sign(String username, String userId) {
        //            过期时间
        Date date = new Date(System.currentTimeMillis() + 30*EXPIRE_TIME);
//            私钥及加密算法
        Algorithm algorithm = Algorithm.HMAC256(TOKEN_SECRET);
//            设置头部信息
        Map<String, Object> header = new HashMap<>(2);
        header.put("typ", "JWT");
        header.put("alg", "HS256");
        // 附带username,userId信息,生成签名
        return JWT.create()
                .withHeader(header)
                .withClaim("loginName", username)
                .withClaim("userId", userId)
                .withExpiresAt(date)
                .sign(algorithm);
    }

}
八、跨域问题
1 |
|
一般情况,对于跨域问题,后端的处理方式为配置cors。但是要注意:在前后端分离的跨域配置里面,origin的配置尤其重要。一般设置为前端的域名,这样会安全的多。
九、全局异常处理
1 |
|
1 |
|
目前后端处理了401、404、500这几种异常类型,尤其要注意404,因为它比较特殊。当时开发的时候在对401、404的问题上进行一番探究。
按道理:如果一个不存在(没有注册controller)请求,一般情况话应该是404;一个存在的请求,并且没有token验证通过,才会是401
如果,我们不去处理404的话,直接被tokenInterceptor处理了,最终会返回的是401错误,而不是404。所以,我们需要在异常处理里面处理好404的异常。
postman
运行之后,就可以用postman访问localhost:9090/xxx来测试接口了
这里再教大家一个方法,设置全局的token。因为,登录之后,很多接口都是需要token来访问的,所以全局变量token无疑是最好的方式,postman也支持。
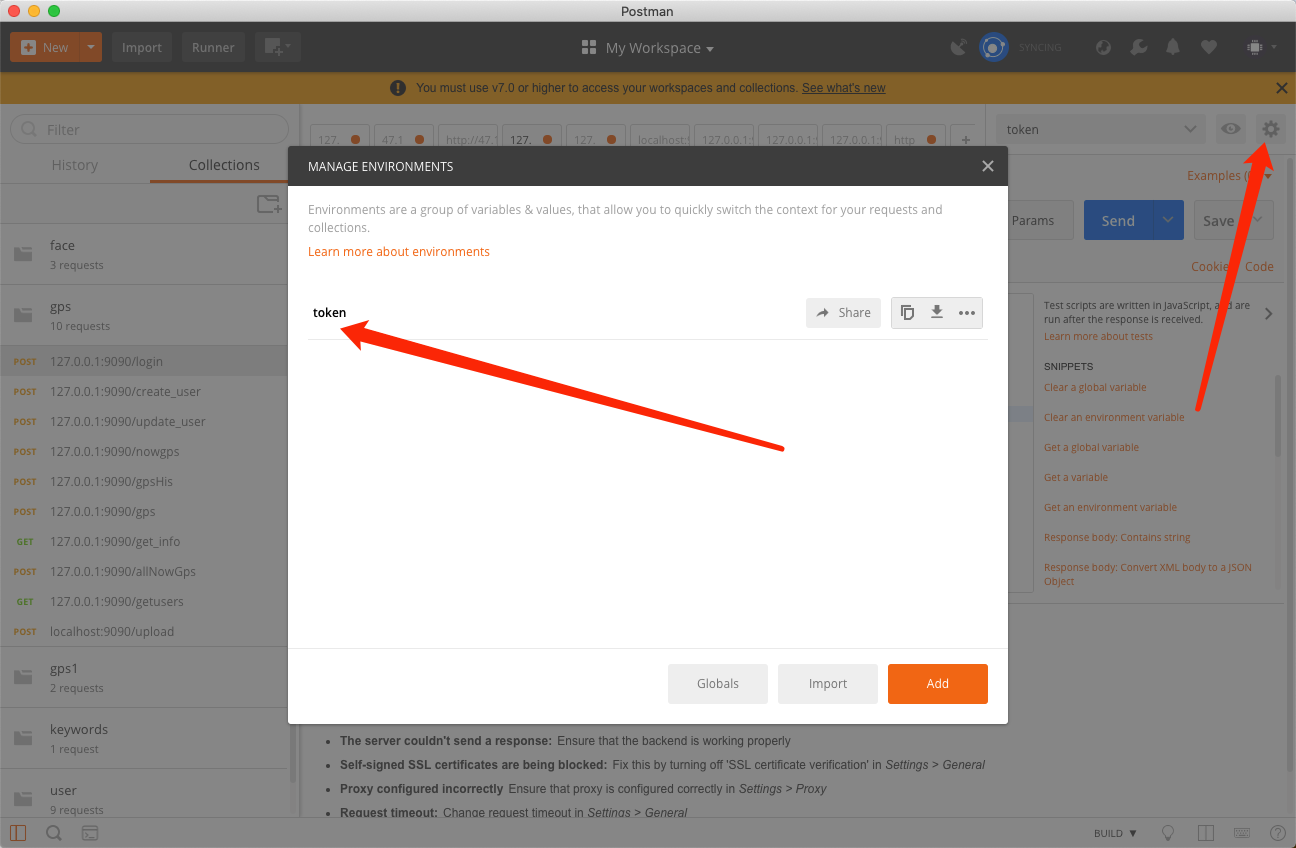
设置response的全局变量设置
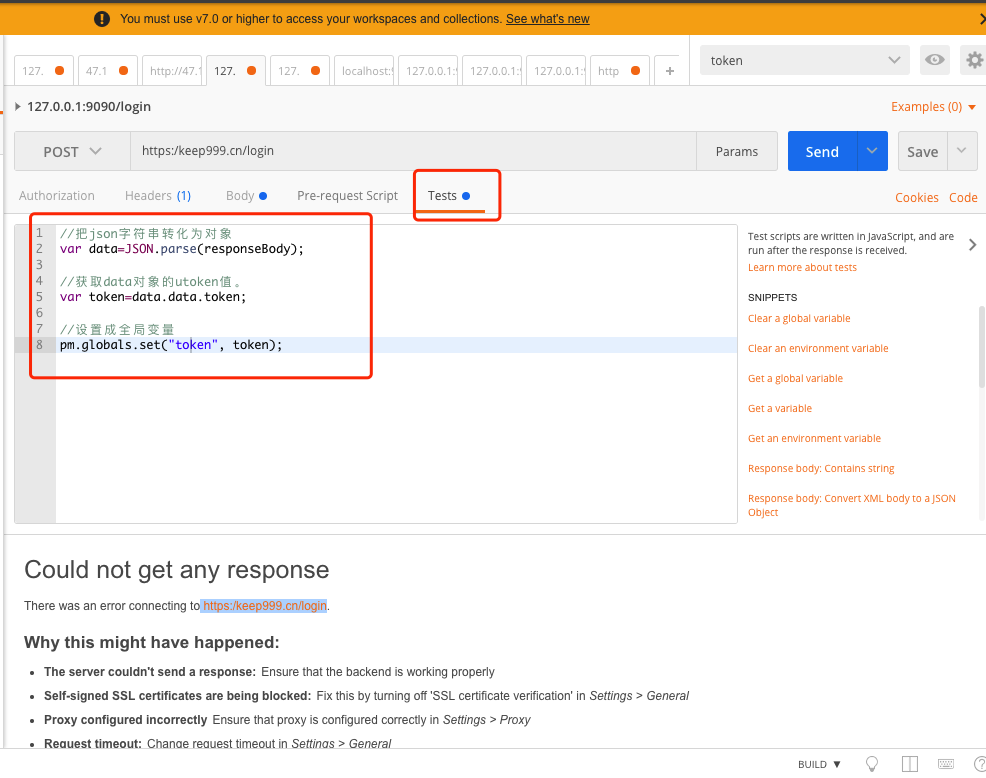
1 | //把json字符串转化为对象 |
使用token
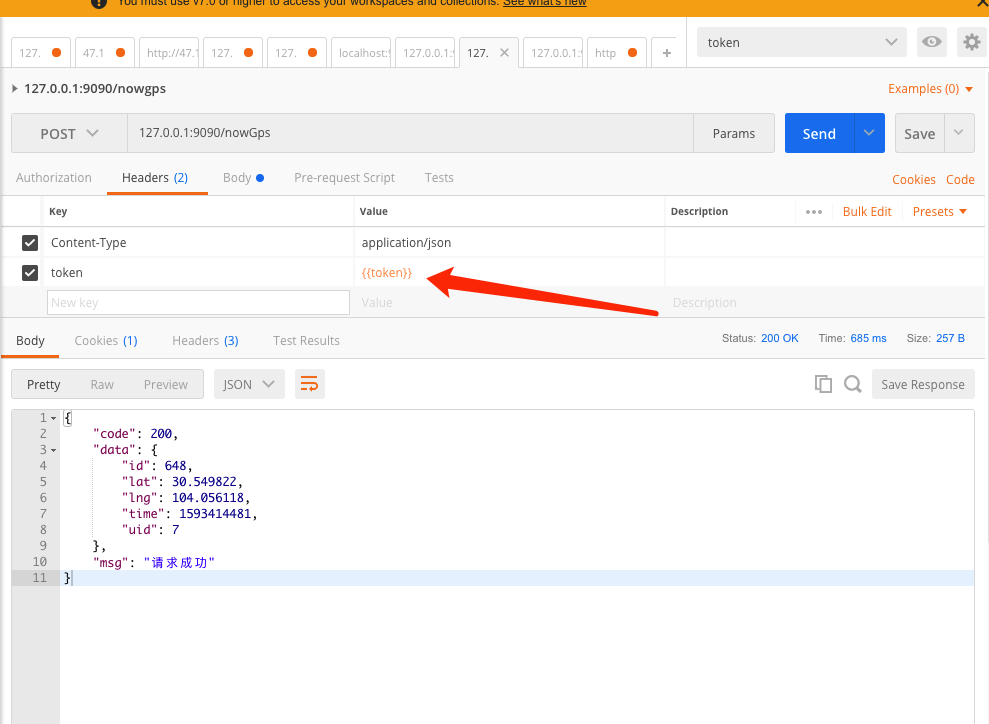
OK 这样的话,登录成功之后,其他需要token的接口就可以直接使用啦。
打包
使用maven插件install即可在target下生成demo-0.0.1-SNAPSHOT.jar包,jar的名字可以通过pom.xml来修改
1 | <groupId>com.jafir.springboot</groupId> |
支持https
在application.yaml中配置
1 | server: |
我这里使用的pkcs12的证书,证书是使用arme.sh免费申请的。tomcat支持jks、pkcs12(pkx)的证书,arme.sh也可以直接转成pkcs的证书,详情可以参看Docker nginx https二级域名无端口访问多个web项目
路径的话可以是绝对路径,也可以是相对路径。在服务器docker容器中,所以我用的是绝对路径,映射的服务器的证书文件目录。
大致提下创建容器命令
1 | docker run --name gps -p 9090:9090 -d -v /mydockerdata/java/gps/upload:/Users/jafir/Downloads/upload -v /mydockerdata/arme/out/*.keep999.cn/*.keep999.cn.pfx:/Users/jafir/Downloads/upload/cert/*.keep999.cn.pfx gps:1.0 |
十、关于前后端分离
现在越来越多的大中型项目都开始采用前后端分离的模式来进行开发了,前后端分离,有这些好处:
1、前端网页加载更快,容灾增强,解耦,减轻服务器压力
2、代码分离,前端较为热门,更新快,改动频繁,拆分之后更易迭代更新,更多去处理用户交互、性能优化方面的问题;后端较为稳定,纯接口提供,更多去处理微服务、数据库优化、分布式、容灾、大数据方面的问题(术业有专攻,职责清晰)
3、后端数据可供移动端、前端、甚至桌面应用等多端使用
4、分离之后,对于微服务方面可以做更多的扩展,为扩展后分布式下的高效、稳定可靠的运行打下基础
总结
java后端功能较为简单,即为纯提供数据接口。对于java后端,其实更多的学问和难度在于面对大数量级的处理,分布式、微服务、集群管理、负载均衡、容灾系统、安全架构、日常监控、数据库优化、高并发处理、消息中间件等等很多东西。此项目是指基础的练手项目,以后的路还很长啊,所以,要加油啊💪
接下来,数据也有了,用户管理也有了,基本的东西都凑齐了。就差前端web来展示地图相关的实时定位、历史轨迹、用户管理等功能展示了。
关于作者
作者是一个热爱学习、开源、分享,传播正能量,喜欢打篮球、头发还很多的程序员-。-
热烈欢迎大家关注、点赞、评论交流!
简书:https://www.jianshu.com/u/d234d1569eed
github:https://github.com/fly7632785