前言
GPS系列——Vue前端,github项目地址
前面已经学习了Android、Java端的代码实现,现在开始介绍网站前端vue的管理框架。
文中也会有大量代码,对于admin管理框架,我是模仿iview-amin,然后新建一个项目,手敲下来的,只取了自己所需的模块,目的就是为了练手,期间也遇到了很多问题,建议大家也可以自己模仿者手敲一遍。也可以使用elementUI,这个框架整体而言比iview更好一些。
GPS定位系统系列
GPS定位系统(一)——介绍
GPS定位系统(二)——Android端
GPS定位系统(三)——Java后端
GPS定位系统(四)——Vue前端
GPS定位系统(五)——Docker
收获
学习完这篇文章你将收获:
- Vue + Vue-cli + iview + axios + vue-router + vuex 的实践
- 高德地图 js api的使用
- axios restful接口的异常处理封装
- 上传头像
- modal弹框编辑个人信息template
- admin管理框架
[TOC]
正题
一、admin框架介绍

框架搭建了整体架构,单页面的web应用。通用缩放式菜单栏,选项卡式管理网页、面包屑导航、bug日志管理、全屏等功能。
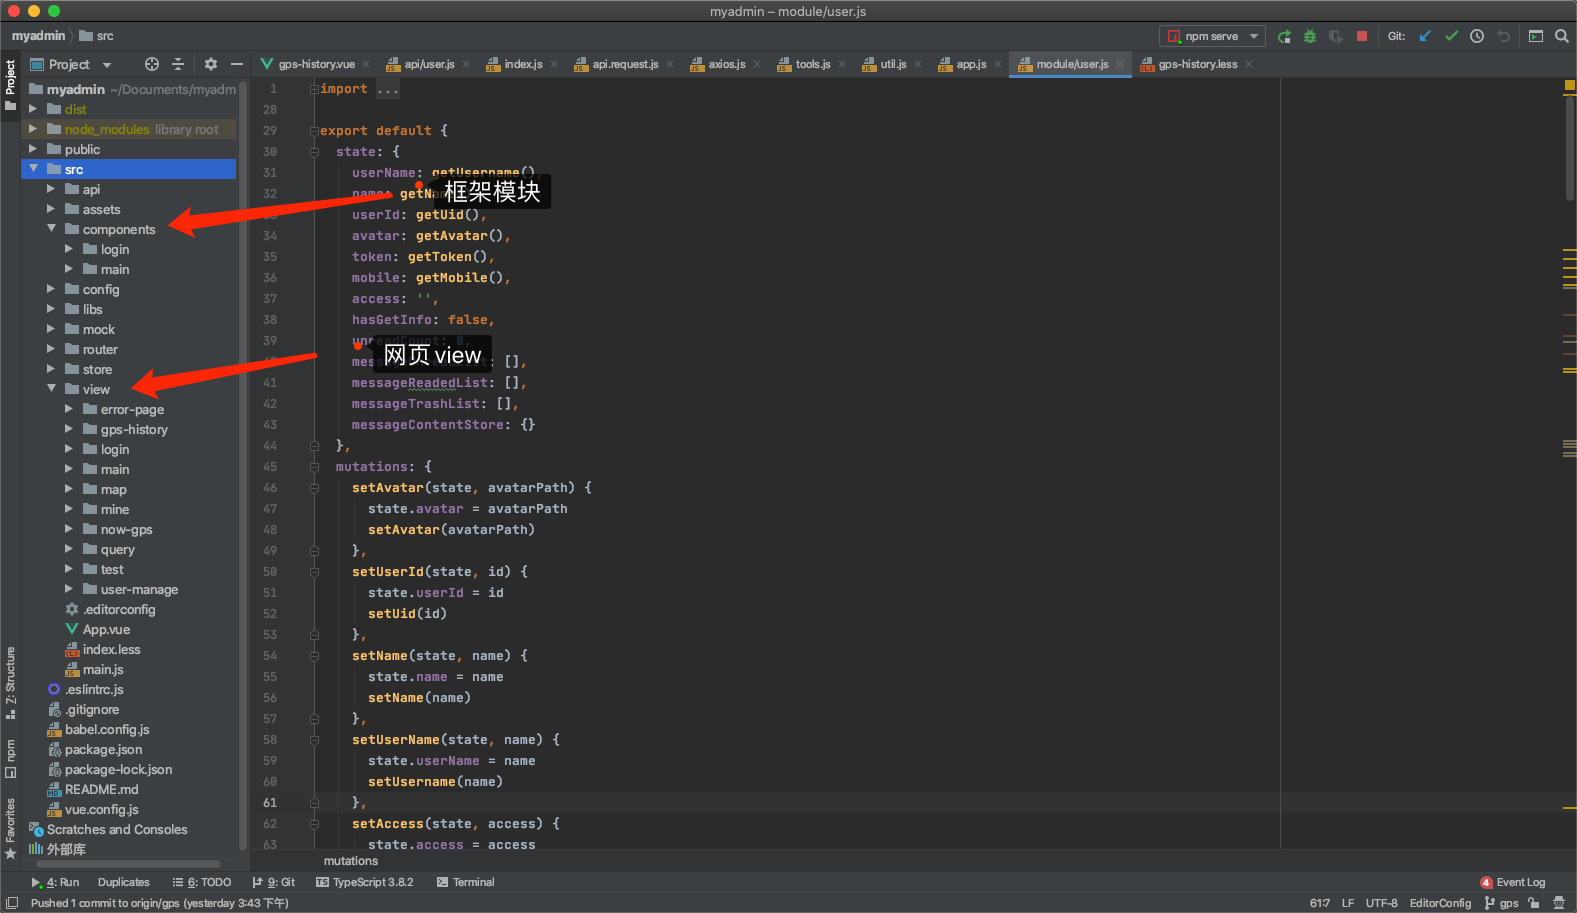
框架使用了通用热门的 VUE一套框架,包括Vue + Vue-cli + vuex + vue-router+iview,具体还请参见源码。
单页面大致结构
1
2
3
4
5
6
7
8
9
10
11
12
13
14
15
16
17
18
19
20
21
22
23
24
25
26
27
28
29
30
31
32
33
34
35
36
37
38
39
40
41
42
43
44
45
46
47
48
49
50
51
52
53
54
55
56
57
58
59
60
61
62
63
64
65
66
67
68
69
70
71
72
73
74
75
76
77
78
79
80
81
82
83
84
85
86
87
88
89
90
91
92
93
94
95
96
97
98
99
100
101
102
103
104
105
106
| <template>
<Layout style="height: 100%" class="main">
<Sider ref="sider" class="sider" hide-trigger collapsible :collapsed-width="78" v-model="isCollapsed">
<div class="logo-con">
<img v-show="!isCollapsed" :src="maxLogo" class="max-logo" key="max-logo"/>
<img v-show="isCollapsed" :src="minLogo" class="min-logo" key="min-logo"/>
</div>
<!-- 展开状态-->
<Menu class="open-menu" ref="menu" :active-name="$route.name" :open-names="openedNames" theme="dark" width="auto"
v-show="!isCollapsed"
@on-select="turnToPage">
<template v-for="item in menuList">
<!-- 有children且只有1个-->
<template v-if="item.children && item.children.length===1">
<MenuItem :name='item.children[0].name'>
<Icon :type="item.children[0].meta.icon"></Icon>
<span>{{showTitle(item.children[0])}}</span>
</MenuItem>
</template>
<template v-else>
<!-- 有children 大于1个嵌套-->
<template v-if="item.children && item.children.length>1">
<Submenu :name='item.name'>
<template slot="title">
<Icon :type="item.meta.icon || ''"/>
<Span>{{showTitle(item) }}</Span>
</template>
<template v-for="subitem in item.children">
<MenuItem :name="subitem.name">
<Icon :type="subitem.meta.icon"></Icon>
<Span>{{showTitle(subitem)}}</Span>
</MenuItem>
</template>
</Submenu>
</template>
<!-- 没有children-->
<template v-else>
<MenuItem :name='item.name'>
<Icon :type="item.meta.icon"></Icon>
<Span>{{showTitle(item)}}</Span>
</MenuItem>
</template>
</template>
</template>
</Menu>
<!-- 收缩状态-->
<div v-show="isCollapsed" class="close-menu">
<template v-for="item in menuList">
<template v-if="item.children && item.children.length>0">
<Dropdown placement="right-start" @on-click="turnToPage" class='dropdown'>
<a type="text" class="drop-menu-a">
<Icon :type="item.meta.icon"></Icon>
</a>
<template v-for="subitem in item.children">
<DropdownMenu slot="list">
<DropdownItem :name="subitem.name">
<a type="text" class="drop-item-a">
<Icon :type="subitem.meta.icon"></Icon>
<span>{{showTitle(subitem)}}</span>
</a>
</DropdownItem>
</DropdownMenu>
</template>
</Dropdown>
</template>
<template v-else>
<Tooltip transfer placement="right" :content="showTitle(item)">
<a @click="turnToPage(item.name)" type="text" class="drop-menu-a">
<Icon :type="item.meta.icon"></Icon>
</a>
</Tooltip>
</template>
</template>
</div>
</Sider>
<layout>
<Header class="header" :style="{padding:0}">
<Icon @click.native="collapsedSider" :class="rotateIcon" :style="{margin:'0 20px'}" type='md-menu'
size="24"></Icon>
<custom-bread-crumb show-icon style="margin-left: 30px;" :list="breadCrumbList"></custom-bread-crumb>
<div class="header-right">
<user :message-unread-count="0" :user-avatar="userAvatar" :user-name="userName"/>
<error-store v-if="$config.plugin['error-store'] && $config.plugin['error-store'].showInHeader"
:has-read="hasReadErrorPage" :count="errorCount"></error-store>
<fullscreen v-model="isFullscreen" style="margin-right: 10px;"/>
</div>
</Header>
<Content class="main-content-con">
<Layout class="main-layout-con">
<div class="tag-nav-wrapper">
<tags-nav :value="$route" @input="handleClick" :list="tagNavList" @on-close="handleCloseTag"></tags-nav>
</div>
<Content class="content-wrapper">
<keep-alive>
<router-view/>
</keep-alive>
</Content>
</Layout>
</Content>
<!-- <Footer class="footer">Footer</Footer>-->
</layout>
</Layout>
</template>
|
对于缩放菜单的功能较为复杂,可以细品一下,能收获许多。
二、axios封装
我们的java后台的接口统一数据为restful结构的
1
| {code:xxx,msg:xxx,data:xxx}
|
对于axios而言封装上面要注意其返回的respon的结构,以及异常response的结构的处理。
这里先放整体axios封装代码:
axios.js
1
2
3
4
5
6
7
8
9
10
11
12
13
14
15
16
17
18
19
20
21
22
23
24
25
26
27
28
29
30
31
32
33
34
35
36
37
38
39
40
41
42
43
44
45
46
47
48
49
50
51
52
53
54
55
56
57
58
59
60
61
62
63
64
65
66
67
68
69
70
71
72
73
74
75
76
77
78
79
80
81
82
83
84
85
86
87
88
89
90
91
92
93
94
95
96
97
98
99
100
101
102
103
104
105
106
107
108
109
110
111
112
113
114
115
116
117
118
119
120
121
122
123
| import axios from 'axios'
import store from '@/store'
import {Message} from 'iview'
const addErrorLog = errorInfo => {
const {statusText, status, request: {responseURL}} = errorInfo
let info = {
type: 'ajax',
code: status,
mes: statusText,
url: responseURL
}
console.log("addErr:" + JSON.stringify(info))
if (!responseURL.includes('save_error_logger')) store.dispatch('addErrorLog', info)
}
class HttpRequest {
constructor(baseUrl = baseURL) {
this.baseUrl = baseUrl
this.queue = {}
}
getInsideConfig() {
const config = {
baseURL: this.baseUrl,
}
return config
}
destroy(url) {
delete this.queue[url]
if (!Object.keys(this.queue).length) {
}
}
interceptors(instance, url) {
instance.interceptors.request.use(config => {
if (!Object.keys(this.queue).length) {
}
this.queue[url] = true
return config
}, error => {
return Promise.reject(error)
})
instance.interceptors.response.use(res => {
console.log("res:" + JSON.stringify(res))
this.destroy(url)
const {data: {code, data, msg}, config} = res
if (code == 200) {
return data;
} else {
this.dealErr(code, msg)
let errorInfo = {
statusText: msg,
status: code,
request: {responseURL: config.url}
}
addErrorLog(errorInfo)
return Promise.reject(res.data)
}
}, error => {
console.log("error:" + JSON.stringify(error))
this.destroy(url)
let errorInfo = error.response
if (!typeof(errorInfo) === undefined && !errorInfo) {
const {request: {statusText, status}, config} = JSON.parse(JSON.stringify(error))
errorInfo = {
statusText,
status,
request: {responseURL: config.url}
}
addErrorLog(errorInfo)
const data = {code: status, msg: statusText}
this.dealErr(data.code, data.msg)
} else {
Message.error('网络出现问题,请稍后再试')
}
return Promise.reject(error)
})
}
dealErr(c, msg) {
console.log("code:" + c)
console.log("msg:" + msg)
switch (c) {
case 400:
Message.error(msg)
break;
case 401:
Message.error('登录过期,请重新登录')
break;
case 404:
Message.error('网络请求不存在')
break;
default:
Message.error("系统错误")
}
}
request(options) {
const instance = axios.create()
options = Object.assign(this.getInsideConfig(), options)
this.interceptors(instance, options.url)
return instance(options)
}
}
export default HttpRequest
|
api.request.js:
1
2
3
4
5
6
| import HttpRequest from '@/libs/axios'
import config from '@/config'
const baseUrl = config.baseUrl
const axios = new HttpRequest(baseUrl)
export default axios
|
调用:
1
2
3
4
5
6
7
8
9
10
11
12
13
14
15
16
17
| import axios from '@/libs/api.request'
import Qs from 'qs'
export const login = ({username, password}) => {
const data = {
username,
password
}
return axios.request({
url: 'login',
headers: {
'Content-Type': 'application/x-www-form-urlencoded'
},
data: Qs.stringify(data),
method: 'post'
})
}
|
注意:如果要使用form表单的形式,需要做转化,这里可以简单方便的使用Qs库来直接stringify,也别忘了设置headers的'Content-Type': 'application/x-www-form-urlencoded',因为axios默认的是json格式。
1、interceptors的response编写
1
2
3
4
5
6
7
8
9
10
11
12
13
14
15
16
17
18
| res => {
console.log("res:" + JSON.stringify(res))
this.destroy(url)
const {data: {code, data, msg}, config} = res
if (code == 200) {
return data;
} else {
this.dealErr(code, msg)
let errorInfo = {
statusText: msg,
status: code,
request: {responseURL: config.url}
}
addErrorLog(errorInfo)
return Promise.reject(res.data)
}
}
|
1
2
3
4
5
6
7
8
9
10
11
12
13
14
15
16
17
18
19
20
21
22
23
24
25
26
27
28
29
30
31
32
33
34
35
36
37
| {
"data":{
"code":200,
"data":{
xxxx
},
"msg":"请求成功"
},
"status":200,
"statusText":"",
"headers":{
"content-length":"487",
"content-type":"application/json;charset=UTF-8"
},
"config":{
"url":"http://127.0.0.1:9090/get_info",
"method":"post",
"headers":{
"Accept":"application/json, text/plain, */*",
"token":"eyJhbGciOiJIUzI1NiIsInR5cCI6IkpXVCJ9.eyJsb2dpbk5hbWUiOiJrayIsImV4cCI6MTU5Njk1Nzg1MSwidXNlcklkIjoiMTMifQ.ChaBg4n5KKsF7ISj8uzHV0eh_JKadoVIBtNG4oUtp8U"
},
"baseURL":"http://127.0.0.1:9090/",
"transformRequest":[
null
],
"transformResponse":[
null
],
"timeout":0,
"xsrfCookieName":"XSRF-TOKEN",
"xsrfHeaderName":"X-XSRF-TOKEN",
"maxContentLength":-1
},
"request":{
}
}
|
注意,axios接口请求的response的数据结构如上。
可以看到获取数据需要res.data.data,我们这里用解构 const {data: {code, data, msg}, config} = res 一下,code==200(其实是res.data.code)的时候返回data(其实就是返回res.data.data)
2、error处理
这里的error可以分为3类:
- 服务器端的业务的http error
- 前端的http error
- 前端非http error
1
2
3
4
5
6
7
8
9
10
11
12
13
14
15
16
17
18
19
| dealErr(c, msg) {
console.log("code:" + c)
console.log("msg:" + msg)
switch (c) {
case 400:
Message.error(msg)
break;
case 401:
Message.error('登录过期,请重新登录')
break;
case 404:
Message.error('网络请求不存在')
break;
default:
Message.error("系统错误")
}
}
|
这里封装一个方法,用于处理服务器端的业务的http error和前端的https error,因为他们结构都是相同的。
1
2
3
4
5
6
7
8
9
10
11
12
13
14
15
16
17
18
19
| error => {
console.log("error:" + JSON.stringify(error))
this.destroy(url)
let errorInfo = error.response
if (!typeof(errorInfo) === undefined && !errorInfo) {
const {request: {statusText, status}, config} = JSON.parse(JSON.stringify(error))
errorInfo = {
statusText,
status,
request: {responseURL: config.url}
}
addErrorLog(errorInfo)
const data = {code: status, msg: statusText}
this.dealErr(data.code, data.msg)
} else {
Message.error('网络出现问题,请稍后再试')
}
return Promise.reject(error)
}
|
但是还有一种error也要处理,这里判断如果error.response不为空,则为http类型的error,使用dealErr,如果为空,则说明是非http类型的err,直接toast 网络出现问题,请稍后再试(比如,前端跨域报错,请求不符合规范等错误,就是非http类型的err)
结构如下
1
2
3
4
5
6
7
8
9
10
11
12
13
14
15
16
17
18
19
20
21
22
23
24
25
| {
"message":"Network Error",
"name":"Error",
"stack":"createError handleError",
"config":{
"url":"http://127.0.0.1:9090/login",
"method":"post",
"data":"username=kk&password=kk",
"headers":{
"Accept":"application/json, text/plain, */*",
"Content-Type":"application/x-www-form-urlencoded"
},
"baseURL":"http://127.0.0.1:9090/",
"transformRequest":[
null
],
"transformResponse":[
null
],
"timeout":0,
"xsrfCookieName":"XSRF-TOKEN",
"xsrfHeaderName":"X-XSRF-TOKEN",
"maxContentLength":-1
}
}
|
三、高德地图相关功能
1、引入sdk使用
1)在public文件夹下的index.html的
中加入
<script type="text/javascript" src="https://webapi.amap.com/maps?v=1.4.15&key=你的key"></script>
注意这里需要在body前面,不然有时候地图加载不出来
vue.config.js配置文件中加入
1
2
3
4
5
6
7
8
| module.exports = {
configureWebpack: {
externals: {
'AMap': 'AMap',
'AMapUI': 'AMapUI'
},
},
}
|
2)vue文件的template中加入
注意map需要设置宽高
1
2
3
4
| #map{
width: 100%;
height: 100%;
}
|
文件中引入mapUI
1
2
3
| <script src="//webapi.amap.com/ui/1.1/main.js"></script>
<script>
import AMap from 'AMap'
|
3)使用
1
2
3
4
5
6
7
8
9
| const map = new AMap.Map('map', {
resizeEnable: true,
zoom: 11
})
this.map = map
map.plugin(['AMap.ToolBar', 'AMap.MapType'], function () {
map.addControl(new AMap.ToolBar())
map.addControl(new AMap.MapType({showTraffic: false, showRoad: false}))
})
|
注意:如果同一页面使用多个地图,需要div的id设置为不同,比如,map1、map2等,Map()构造也要传入相应的map id
不出意外,地图就能加载出来了。
2、实时定位

实时定位功能主要逻辑为:
1、从接口获取所有人的最新的定位信息,然后生成marker标注在地图上
2、并且给每个标注都注入个人信息,如头像、名字、时间等信息
3、可以下拉选择用户,定位到地图中心,且打开infoWindow展示个人信息
4、由于接口是没有存具体地址的,需要利用经纬度坐标,转为具体地址展示在infowindow上
详情,请参看源码。
获取接口数据,添加markers和dropdown
1
2
3
4
5
6
7
8
9
10
11
12
13
14
15
16
17
18
19
20
21
22
23
24
25
26
27
28
29
30
31
32
33
34
35
36
37
38
39
| allNowGps() {
this.getAllNowGps().then(res => {
this.data = res;
this.addMarkers(res)
this.addDropDown(res)
console.log("res", JSON.stringify(res))
})
},
addMarkers(data) {
this.infoWindow = new AMap.InfoWindow({offset: new AMap.Pixel(0, -70)});
data.forEach((item, index) => {
var marker = new AMap.Marker({
position: [item.lng, item.lat],
icon: personLogo,
offset: new AMap.Pixel(-15, -66),
map: this.map,
extData: item,
});
var info = this.getContentByItem(item);
marker.content = info.join("<br/>")
marker.on('mouseover', this.markerHover);
})
this.map.setFitView();
},
addDropDown(res) {
if (res && res.length > 0) {
res.forEach(item => {
if (item.uid == this.$store.state.user.userId) {
this.currentUser = item
this.map.setCenter([item.lng, item.lat])
}
})
}
},
|
hover之后展示infowindow
1
2
3
4
5
6
7
8
9
10
11
12
13
14
15
16
| markerHover(e) {
var _this = this
this.geocoder.getAddress(e.target.getPosition(), function (status, result) {
if (status === 'complete' && result.info === 'OK') {
var address = result.regeocode.formattedAddress;
console.dir(address);
const content = e.target.content + '<br/>地址:' + address;
const marker = e.target
const item = e.target.getExtData()
console.log('extData', e.target.getExtData());
_this.infoWindow.setContent(content)
_this.infoWindow.open(_this.map, e.target.getPosition());
}
});
},
|
这里e.target其实就是marker,然后marker的extData可以装载 item的数据,这里也取出来展示
注意,这里使用了geocoder来把经纬度坐标转为具体地址
3、历史轨迹
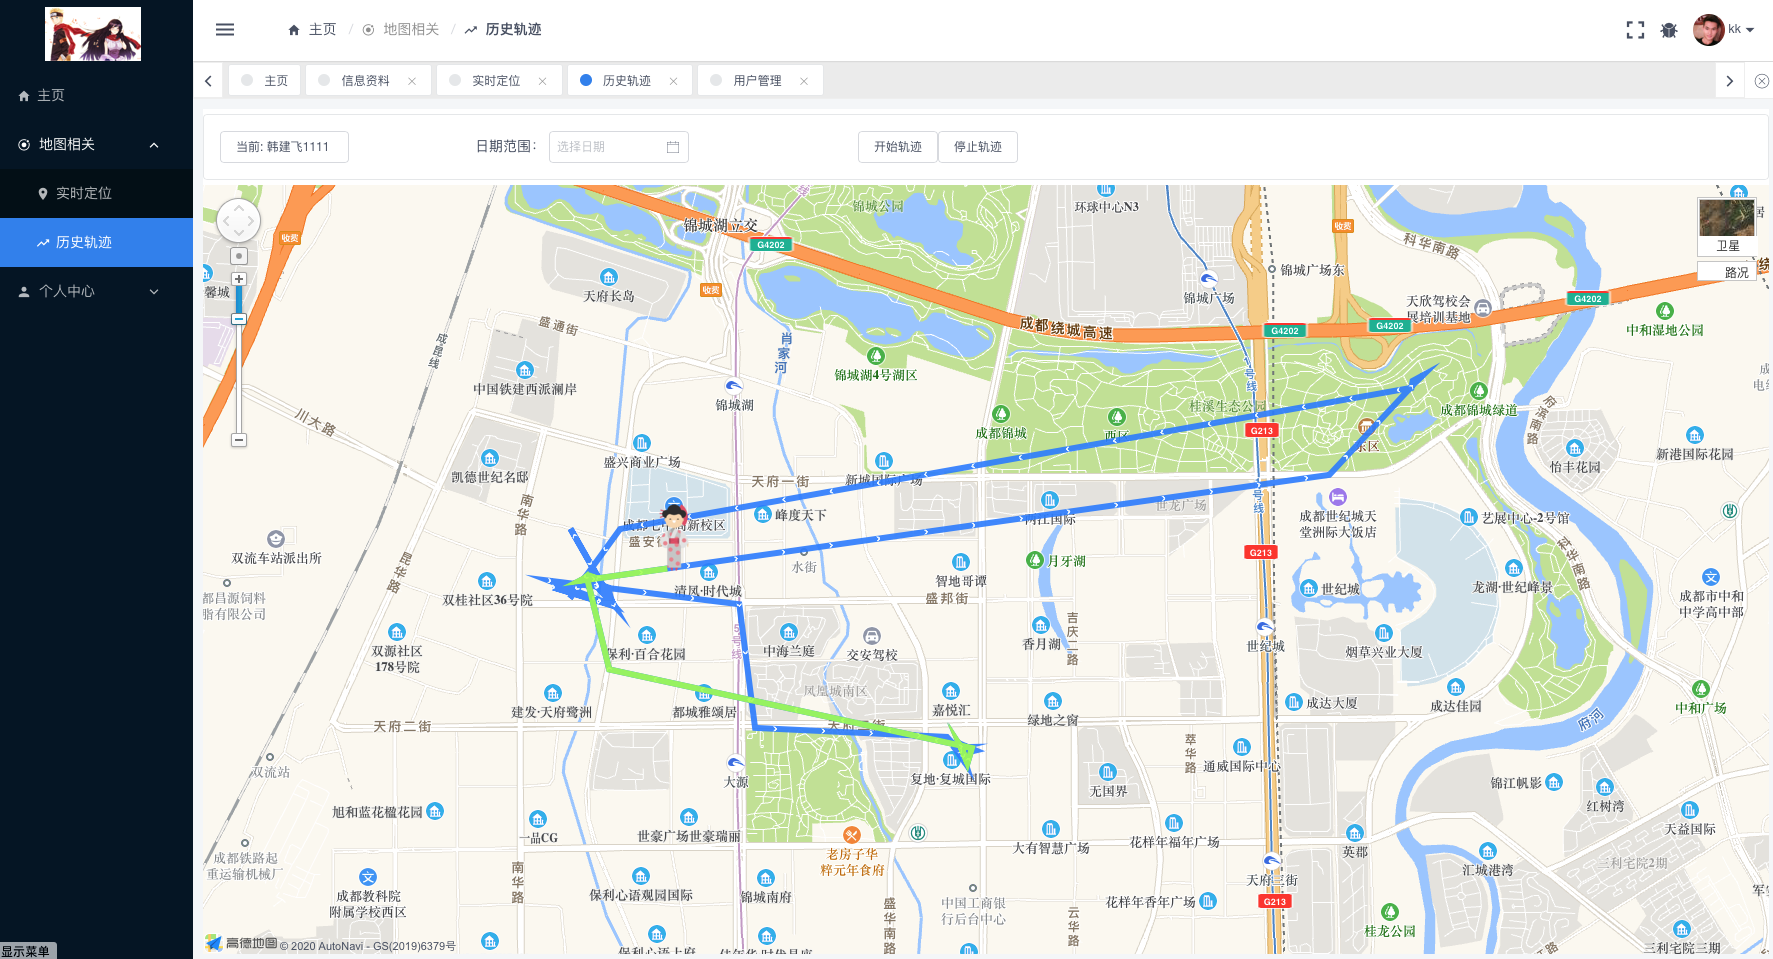
历史轨迹功能主要逻辑为:
1、默认获取当前用户的历史轨迹数据,可以通过日期筛选,并生成轨迹和marker
2、获取所有的用户,生成选择下拉列表,选择下拉,可以获取对应用户的历史轨迹数据
3、利用高德地图的绘制轨迹
4、开始marker沿着轨迹移动,模拟移动行为
1
2
3
4
5
6
7
8
9
10
11
12
13
14
15
16
17
18
| allUsers() {
this.handleGetAllUsers().then(res => {
console.log("users", JSON.stringify(res))
let users = [];
users = res;
this.users = users
if (res && users.length > 0) {
users.forEach(item => {
if (item.uid == this.$store.state.user.userId) {
this.currentUser = item
this.selectGpsHis(item.uid)
}
})
}
})
},
|
获取所有用户
1
2
3
4
5
6
| selectGpsHis(uid, from, to) {
this.getGpsHis({uid, from, to}).then(data => {
console.log("getGpsHis", JSON.stringify(data))
this.showGpsHis(data)
})
},
|
获取对应用户的历史轨迹数据
1
2
3
4
5
6
7
8
9
10
11
12
13
14
15
16
17
18
19
20
21
22
23
24
25
26
27
28
29
30
31
32
33
34
35
36
37
38
39
40
41
42
43
44
45
46
47
| showGpsHis(data) {
this.map.clearMap()
this.followPath = []
data.forEach((item, index) => {
const gps = [item.lng, item.lat]
this.followPath.push(gps)
})
if (this.followPath.length === 0) {
Message.warning('无历史数据')
return
}
this.marker = new AMap.Marker({
map: this.map,
position: this.followPath[0],
icon: personLogo,
offset: new AMap.Pixel(-15, -66),
});
var polyline = new AMap.Polyline({
map: this.map,
path: this.followPath,
showDir: true,
strokeColor: "#28F",
strokeWeight: 6,
});
var passedPolyline = new AMap.Polyline({
map: this.map,
strokeColor: "#AF5",
strokeWeight: 6,
});
this.marker.on('moving', function (e) {
passedPolyline.setPath(e.passedPath);
});
this.map.setFitView()
},
|
绘制轨迹并且生成marker
1
2
3
4
5
6
| startAnimation() {
this.marker.moveAlong(this.followPath, 5000);
},
stopAnimation() {
this.marker.stopMove()
},
|
开始轨迹、停止轨迹,轨迹速度是按照地图的每小时多少千米的速度来设置的。
注意:拿到的数据,需要重组成 轨迹所需的数据结构。
四、modal弹框template自定义
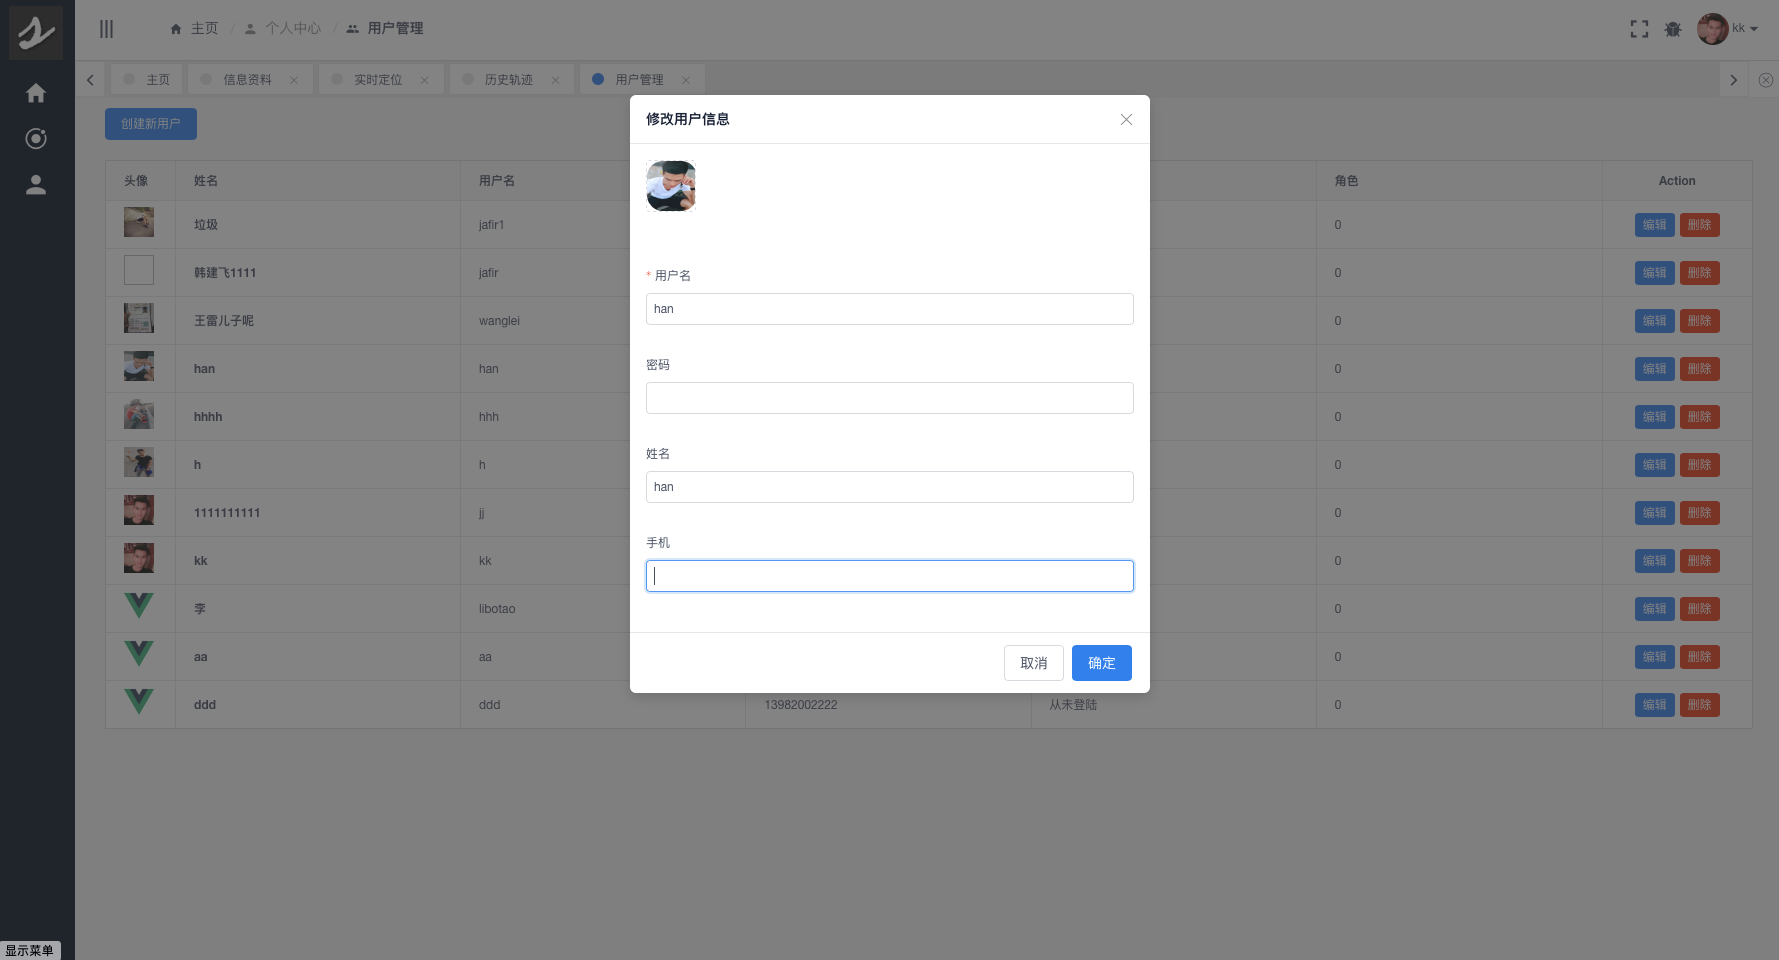
对于用户管理,我们有创建和编辑用户资料,两个格式相同,可以复用。这里自定义的modal模板,可以参考一下。
代码较长:
1
2
3
4
5
6
7
8
9
10
11
12
13
14
15
16
17
18
19
20
21
22
23
24
25
26
27
28
29
30
31
32
33
34
35
36
37
38
39
40
41
42
43
44
45
46
47
48
49
50
51
52
53
54
55
56
57
58
59
60
61
62
63
64
65
66
67
68
69
70
71
72
73
74
75
76
77
78
79
80
81
82
83
84
85
86
87
88
89
90
91
92
93
94
95
96
97
98
99
100
101
102
103
104
105
106
107
108
109
110
111
112
113
114
115
116
117
118
119
120
121
122
123
124
125
126
127
128
129
130
131
132
133
134
135
136
137
138
139
140
141
142
| <template>
<Modal :value="isShow" :title="title" @on-visible-change="handleVisible">
<Upload
ref="upload"
:show-upload-list="false"
:on-success="handleUploadSuccess"
:format="['jpg','jpeg','png']"
:max-size="2048"
:on-format-error="handleUploadFormatError"
:on-exceeded-size="handleUploadMaxSize"
:headers="header"
type="drag"
:action="uploadUrl"
style="display: inline-block;width:50px;height:50px;margin-bottom: 50px">
<Avatar :src='user.avatar' style="width:50px;height: 50px"/>
</Upload>
<Form ref="user" :model="user" :rules="ruleValidate">
<FormItem label="用户名" prop="username">
<Input v-model="user.username"/>
</FormItem>
<FormItem label="密码" prop="password">
<Input v-model="user.password"/>
</FormItem>
<FormItem label="姓名">
<Input v-model="user.name"/>
</FormItem>
<FormItem label="手机" prop="mobile">
<Input v-model="user.mobile"/>
</FormItem>
</Form>
<div slot="footer">
<Button size="large" @click="handleCancel">取消</Button>
<Button type="primary" size="large" @click="handleConfirm('user')">确定</Button>
</div>
</Modal>
</template>
<script>
export default {
name: 'edit-user',
props: {
//姓名、头像、手机、用户名、密码、
user: {
uid: '',
avatar:'',
name: '',
username: '',
password:null,
mobile: '',
},
//是否显示弹框
isShow: false,
//上传所需的token
header: {},
//上传地址
uploadUrl: {},
isEdit: {
type: Boolean
},
},
computed: {
title() {
return this.isEdit === true ? "修改用户信息" : "新建用户信息"
},
ruleValidate() {
console.log('ruleValidate', this.isEdit)
const rule = this.isEdit === true ? this.editRuleValidate : this.createRuleValidate
console.log('ruleValidate', rule)
return rule
}
},
watch:{
isShow(val){
console.log('isShow',val)
}
},
data() {
return {
editRuleValidate: {
username: [
{required: true, message: 'The name cannot be empty', trigger: 'blur'}
],
mobile:[
{ required: false, message: "请输入手机号码", trigger: "blur" },
{ pattern: /^1[3456789]\d{9}$/, message: "手机号码格式不正确", trigger: "blur"}
]
},
createRuleValidate: {
username: [
{required: true, message: 'The name cannot be empty', trigger: 'blur'}
],
password: [
{required: true, message: 'The password cannot be empty', trigger: 'blur'}
],
mobile:[
{ required: false, message: "请输入手机号码", trigger: "blur" },
{ pattern: /^1[3456789]\d{9}$/, message: "手机号码格式不正确", trigger: "blur"}
]
}
}
},
methods: {
handleUploadSuccess(res, file) {
console.log(file.response)
this.user.avatar = file.response
},
handleUploadFormatError(file) {
this.$Notice.warning({
title: 'The file format is incorrect',
desc: 'File format of ' + file.name + ' is incorrect, please select jpg or png.'
});
},
handleUploadMaxSize(file) {
this.$Notice.warning({
title: 'Exceeding file size limit',
desc: 'File ' + file.name + ' is too large, no more than 2M.'
});
},
handleConfirm(name) {
this.$refs[name].validate((valid) => {
console.log('handleConfirm validate',valid)
if (valid) {
this.$emit('ok', {user: this.user, isEdit: this.isEdit})
this.$emit('visible', false)
}
})
},
handleCancel() {
this.$emit('visible', false)
},
handleVisible(visible) {
this.$refs['user'].resetFields();
this.$emit('visible', visible)
}
},
};
</script>
|
使用:
1
2
3
4
5
6
7
8
9
10
| <div v-if="isShowEdit">
<EditUser :user="newUser"
:isEdit="isEdit"
@visible="this.handleEditVisible"
:is-show="true"
:header="{'token': this.$store.state.user.token}"
:upload-url="this.$config.baseUrl + 'upload'"
@ok="handleEditOk"
></EditUser>
</div>
|
通过isEdit去判别是编辑还是新建
这里有一点比较重要:
isShowEdit是用于我们动态去展示和隐藏modal弹框,使用的是v-if。网上很多人,是使用modal的v-model或者value来控制modal的显示和隐藏的,原本我也是那样做的,但是后来发现,那样做非常不稳定和可靠,有时候弹框弹出来,其双向绑定的is-show,并未能和modal的状态统一。所以,最终使用的是div+v-if的方式来控制。
还有就是,关于父组件和子组件之间传值的问题:
父给子,一般是通过props来接收,并且,我们希望的是单向的,父可以改变控制子,但是,子不能改变去控制父,不然会报错。而需要使用,子发事件回调给父,来改变父的状态的方式来实现。
1
2
3
4
5
6
7
8
9
10
11
12
13
14
15
16
17
18
19
|
handleConfirm(name) {
this.$refs[name].validate((valid) => {
console.log('handleConfirm validate',valid)
if (valid) {
this.$emit('ok', {user: this.user, isEdit: this.isEdit})
this.$emit('visible', false)
}
})
},
handleVisible(visible) {
this.$refs['user'].resetFields();
this.$emit('visible', visible)
}
|
this.$emit('visible', false) 使用这个来改变其父的isShowEdit的值,从而隐藏或者显示自身modal。
上传头像
1
2
3
4
5
6
7
8
9
10
11
12
13
14
| <Upload
ref="upload"
:show-upload-list="false"
:on-success="handleUploadSuccess"
:format="['jpg','jpeg','png']"
:max-size="2048"
:on-format-error="handleUploadFormatError"
:on-exceeded-size="handleUploadMaxSize"
:headers="header"
type="drag"
:action="uploadUrl"
style="display: inline-block;width:50px;height:50px;margin-bottom: 50px">
<Avatar :src='user.avatar' style="width:50px;height: 50px"/>
</Upload>
|
上传头像注意下,如果我们上传图标需要header,比如传token的话,需要把header作为参数传进来。
五、登录验证
对于登录验证,我们这边是使用vue-router的beforeEach统一处理页面的跳转来实现的。
1
2
3
4
5
6
7
8
9
10
11
12
13
14
15
16
17
18
19
20
21
22
23
24
25
26
27
28
29
30
31
32
33
34
35
36
37
38
39
40
41
42
43
44
45
46
47
48
49
50
| const router = new Router({
routes: routers,
mode: 'history',
})
const turnTo = (to, access, next) => {
next()
}
router.beforeEach((to, from, next) => {
iView.LoadingBar.start()
const token = getToken()
if (!token && to.name !== LOGIN_PAGE_NAME) {
next({
name: LOGIN_PAGE_NAME
})
} else if (!token && to.name === LOGIN_PAGE_NAME) {
next()
} else if (token && to.name === LOGIN_PAGE_NAME) {
next({
name: homeName
})
} else {
turnTo(to, store.state.user.access, next)
}
})
router.afterEach(to => {
setTitle(to, router.app)
iView.LoadingBar.finish()
window.scrollTo(0, 0)
})
|
总结
源码很多,所以其实很多东西都在源码里面了,可能内容篇幅较长,很少有人能够完整看完,但是,写在这里只为某些时候可能遇到类似问题,有一个借鉴参考的地方即可。就如同,我自己手敲admin框架的时候,很多时候iview-amin就是我的一个可以借鉴和参考的项目,遇到有不会的或者没有思路的,就可以参考借鉴一下,这样会好很多。
整个系列,前端、移动端、后端,都有了,打通了,接下来就是要学习一下,怎么打包,部署到服务器那些东西了。
服务器呢,我打算再使用docker,学习一番docker+nginx+mysql等实现前端和后端的线上部署,具体请参看
GPS定位系统(五)——Docker
关于作者
作者是一个热爱学习、开源、分享,传播正能量,喜欢打篮球、头发还很多的程序员-。-
热烈欢迎大家关注、点赞、评论交流!
简书:https://www.jianshu.com/u/d234d1569eed
github:https://github.com/fly7632785
CSDN:https://blog.csdn.net/fly7632785
掘金:https://juejin.im/user/5efd8d205188252e58582dc7/posts